On VMware, it’s very easy without any problem you can install it but on VBox, it’s not that much easy. You must run some commands. Anyway, in this post I’m going to show you in step by step.
Install VirtualBox Guest Additions on Kali Linux
The VirtualBox Guest Additions provide proper mouse and screen integration, as well as folder sharing, with your host operating system. To install them, proceed as follows. Start up your Kali Linux virtual machine, open a terminal window and issue the following commands. These commands are for latest Kali Linux version.
Second Method
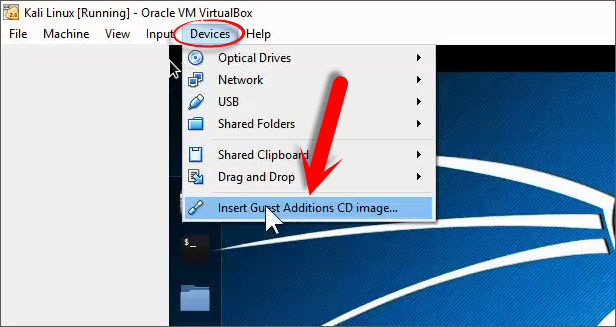
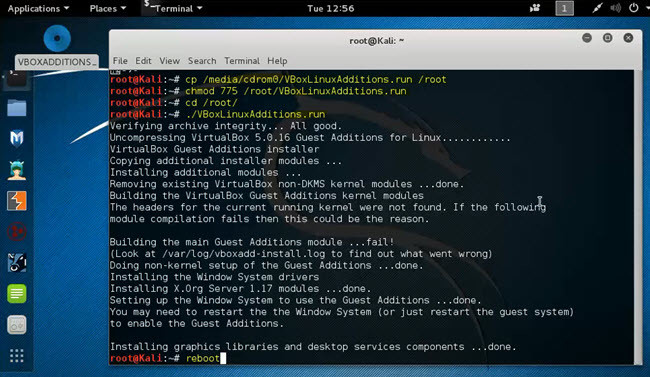
If the above method did not work for you, try this technique. Both methods provide proper mouse and screen integration. When you install the Guest Additions on the guest environment, all the good and advanced feature that you have on real machine. You’ll have those features on the guest environment. Step #1. Start VM and login to your Kali Linux operating system. Once you loged in, from the top menu, tap on “Devices” then click on “Insert Guest Additions CD Image“. This is going to work when your virtual machine is turned on. A new small window will pop up for you that saying “The software will run directly from the medium VBOXADDITIONS_4.2.8. You should never run software that you don’t trust. If in doubt, press Cancel.” You’ll see this message. What you are going to do? If you click on “Run”, nothing will happen. Press “Cancel“. Step #2. Now Open terminal then type these commands.
cp /media/cd-rom/VBoxLinuxAdditions.run /root/ chmod 755 /root/VBoxLinuxAdditions.run cd /root ./VBoxLinuxAdditions.run Reboot
When typed “Reboot”, your virtual machine will restart automatically. After restarting, you’ll have an awesome wide screen.
Conclusion
In this article, I covered that how to install VirtualBox guest additions on Kali Linux and how the commads worked. All these tasks done in this post. If you did not understand any command or any parts, let us know. Thanks for being with us.


